Generally, programs will run faster if your computer has more RAM (Random Access Memory). But if your computer has not enough RAM needed to run a program or operation, Windows uses its Virtual Memory to compensate.
When computer’s RAM runs low, Virtual Memory helps it by giving temporary space on the hard disk. Virtual memory moves the not currently needed process data and instruction from RAM to a space called a paging file when RAM gets filled up. Virtual memory frees up RAM to complete its work.
Low Virtual Memory
If you receive error messages or warnings that your virtual memory is low, you’ll need to increase the minimum size of your paging file so that your computer can run the programs.
Increase the size of paging file
Windows automatically sets the minimum and maximum size of the paging file: the minimum size is equivalent to the amount of RAM installed on your computer plus 300 MB, and the maximum size is 3 times the amount of RAM installed on your computer.
If the default or recommended setting is not enough for your needs, you can manually change it. Here’s how:
- Open your computer’s Advance System Settings:Click the Start button > click Control Panel > click System Security (or System and Maintenance) > click System > then click Advance System Settings in the left pane. If you are prompted for an administrator password or confirmation, type the password or provide confirmation.

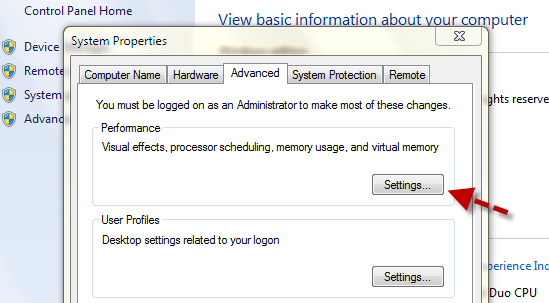
- On the Advanced tab, under Performance, click Settings.

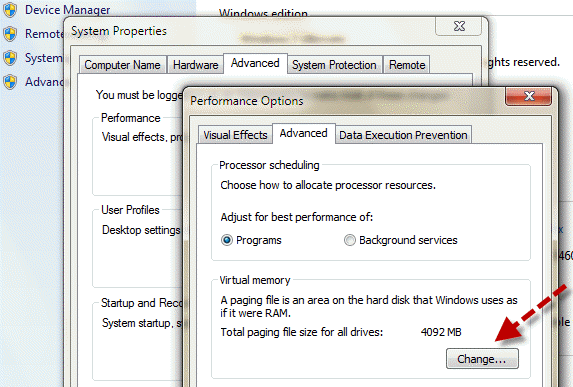
- Click the Advanced tab, and then, under Virtual memory, click Change.

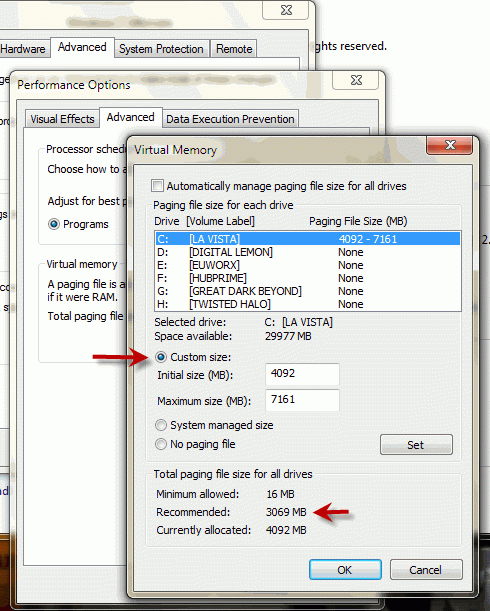
- Clear (uncheck) the “Automatically manage paging file size for all drives check box“.
- Under Drive [Volume Label], select the drive that contains the paging file you want to change.
- Select Custom size, type a new size in megabytes in the Initial size (MB) and Maximum size (MB) box, click Set, and then click OK.
For Windows 7 and Windows Vista
- Go to right-click My Computer and choose Properties.
- In the System Properties dialog box, go to Advanced tab.
- Click Settings button that is from the Performance frame.
- Once the Performance Options shows up on the screen, go to Advanced tab.
- Under the Advanced tab, click the Change button from the Virtual Memory frame to access to the Virtual Memory setting.
For Windows XP
The following procedure is based on windows XP Professional.
How Much Virtual Memory Needed?
The ideal size is the default size. But if you’re receiving error or low memory warning messages with the default setting, use the recommended size (it’s under “Total paging file size for all drives” ) for the Initial size. If the recommended size is still not enough, you can increase it suit your needs.
Note: Setting the virtual memory too large is not a good idea because it will create performance lagging, and it will take the HDD free space.
Example virtual memory setting for a computer that has a 2GB RAM…
Initial size (MB): 3069 (the recommended size)
Maximum size (MB): 6138 (triple the value of the size of the 2GB main memory or RAM)

If you’re running intensive applications and find that your computer’s RAM plus virtual memory is not big enough to run those programs, then you will need to add more RAM onto your system.
Adding RAM is always the better solution because your computer can read data from RAM much more faster than from a hard disk (virtual memory).


Thanks i will try