Microsoft Office 365 provides many features and benefits. And one of the biggest advantages is the ability to work from anywhere as long as you have an internet connection. This is the main reason a lot of businesses and organizations are moving to Office 365. If you’re trying to learn how you can import PST into Office 365, this guide will help you to convert PST file into Office 365 Exchange Online. There are two possible methods; you can use any one of them.
Method 1: Convert PST file into Office 365 Mailbox Manually
Step 1: Upload PST file into Office 365 cloud platform
To upload PST file into Office 365, follow the given instructions.
- First login your Office 365 Admin Account and go to Admin Center then select Exchange.
- Now the Exchange Admin Center window will open on the screen, in this window click on Permissions then a list will appear and choose Organization Management>> + sign >> Mailbox import export >> Add>> ok.
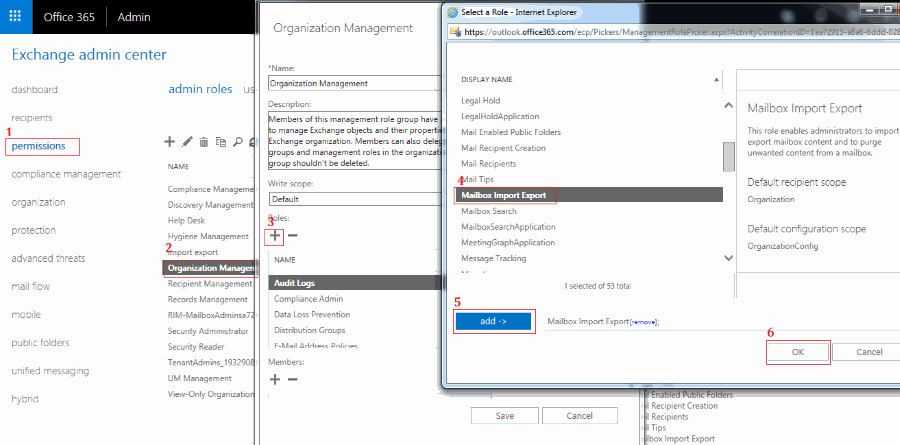
- After click on Ok you will back on Organization Management window and here you need to select Mailbox import export >> Save.
- When you done, go to Admin Center and select Setup then Data Migration and click Upload PST file.
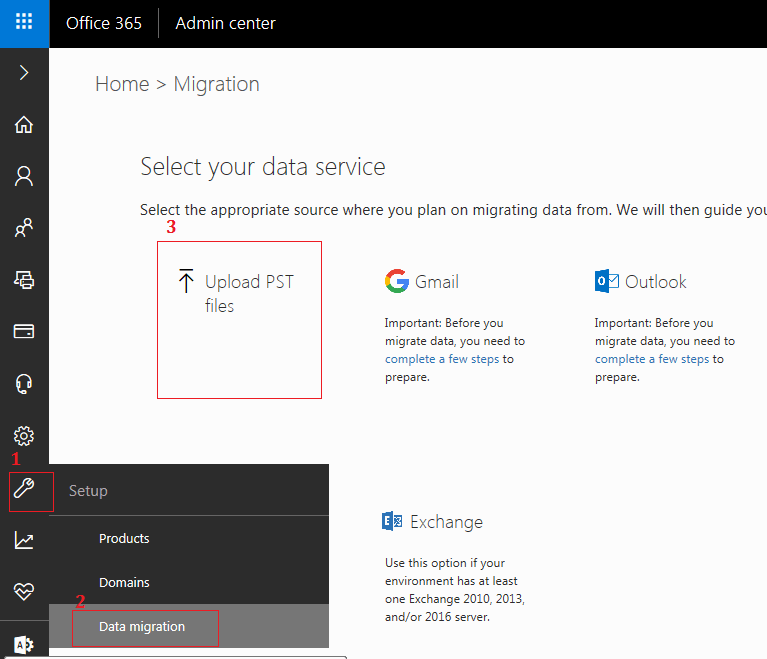
Step 2: Create a Job and upload data in Exchange Online
- Once you click upload PST file you need to create a job by clicking on New Import Job and type the Job Name >> Next.

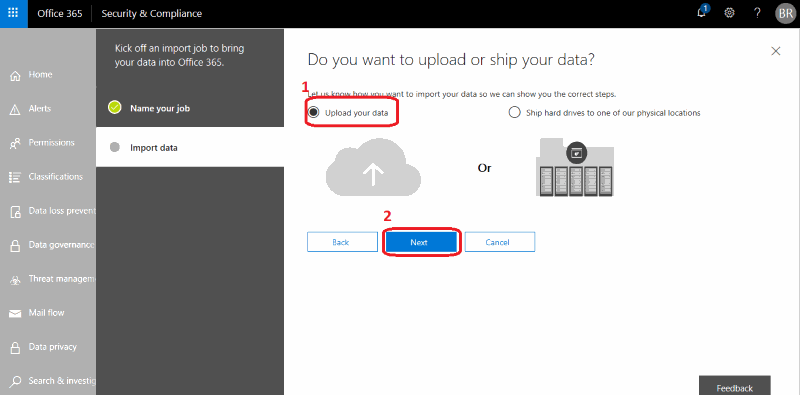
- Then check on Upload your data option and hit on NEXT
Step 3: Install Azure AzCopy tool and use SAS URL
- After clicking next you will see the window on the screen. This is the main part of the PST to Office 365 migration. So click on the Show Network Upload SAS URL, copy the URL by clicking on clipboard and paste on the notepad. When it’s done go to Download Azure AzCopy and install the tool.

- Once it installed just lunch the application and type the given command.
Note: While you are doing this process you have to give the sharing permission of your folder or file where the PST file is saved. And copy the network path.
AzCopy.exe/Source:\\Network Path /Dest:”SAS URL” /V:give location to save log file\AzCopy.log /Y
Example:
AzCopy.exe /Source:\\DESKTOP-MPKVU38\Users\kc\Desktop\Import /Dest:"https://476d07f3b7d444a7a00a5a7.blob.core.windows.net/ingestiondata?sv=2015-04-05&sr=c&si=IngestionSasForAzCopy201806090656050007&sig=hccYVWvlkOhp6FISVYywwt9W9YlzRoQfXqGZvq14jqM%3D&se=2018-07-09T06%3A56%3A09Z" /V:c:\Users\kc\Desktop\AzCopy.log /Y
- Now hit the Enter key on the keyboard.

Now the PST file is successfully stored on Azure AzCopy tool, you can close this window.
Step 4: Create CSV file to move PST file into Exchange Online
- Once you store data into Azure tool you need to create a CSV file to import PST into O365 Mailbox.
| Workload | FilePath | Name | Mailbox | IsArchive | TargetRootFolder |
|---|---|---|---|---|---|
| Exchange | backup.PST | david@l.onmicrosoft.com | FALSE |
- Workload: To import PST files into user mailbox, use Exchange.
- FilePath: To specify the file or folder location. You can leave it blank.
- Name:To specify the PST file name that will be migrate into the user mailbox.
- Mailbox:Type the email address of mailbox, where you want to move PST file.
- IsArchive: Specifies whether to import the PST file into user’s archive mailbox or not. If yes then type TRUE otherwise FALSE.
- TargetRootFolder:Specifies the mailbox folder that the PST file is imported.
- Now go to Import Data window and check on the blow options and click on Next.
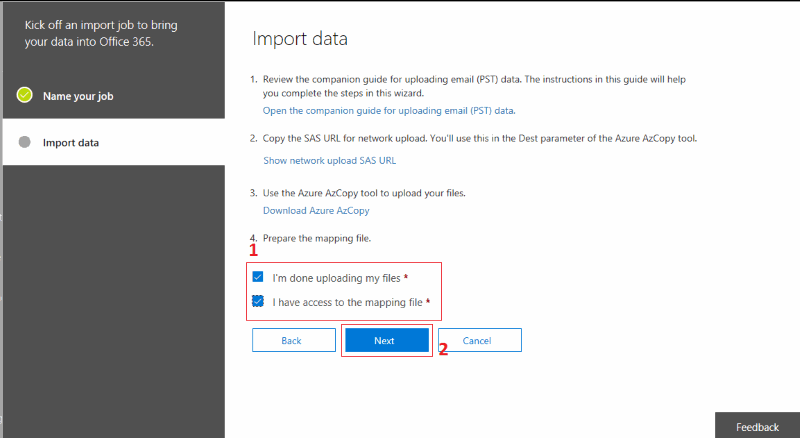
Step 5: Create PST migration mapping file
- After click on next a window will open on the screen, and here you need to upload the created CSV file by clicking Select mapping file option then Validate it once it done just click SAVE.

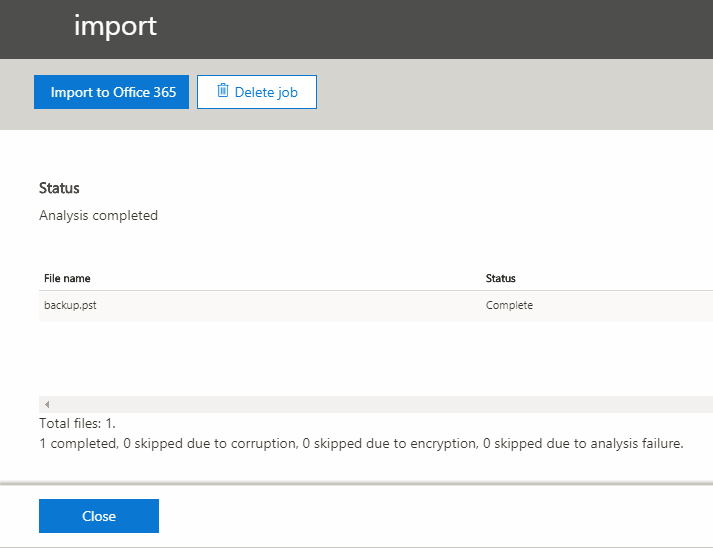
- Once you click on save your PST file will successfully moved on Office 365 account and then hit on Close.
Method 2: Move PST File to Office 365 by Using a Third-party Tool
Here I am going to discuss another way to migratePST into Office 365 cloud platform which is a third-party tool. Because in the above method you can see that manual way is not easy for a non-technical person and it also involves many manual steps.
There are many third-parties is available but I recommend you to use MailsDaddyPST to Office 365 Migration Tool. This is a GUI based application and easy to use. It will migrate your all PST data like emails, calendars, contacts, and attachments into Office 365 mailbox at a time.
To use this tool follow these instructions:
- First, Download and install the application.
- Once it installed just lunch it.
- Click on Add File to upload the PST.
- After that it will show the preview of all items.

- Now click on Export
- Then select export option and enter your Office 365 ID & Password >> click Export button.
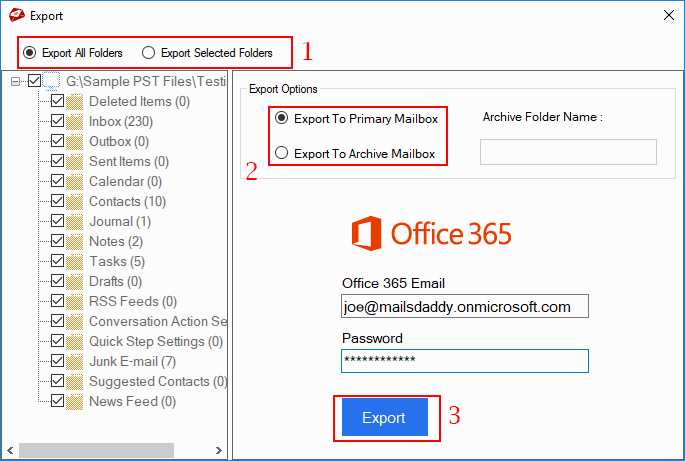
- Once you click Export it will migrate your PST file into Office 365. That’s it.
Here’s a short recap: In this article we just learned how to migrate and import PST file to Office 365 Exchange Online. There are two possible way to convert PST into Office 365. You can choose any one of them as per you convenience. If you still have any doubt just leave a message on the comment box. I will be happy to help you.


Last year, I did the same assignment using Stellar Repair for Outlook Technician. However, we never wished to choose a third party solution but our Outlook data file was inaccessible.
I would like to introduce another reliable solution, developed by Kernel Data recovery, Kernel Import PST to Office 365.
Here I also want to recommend you another solution named A2Z Migrations for PST to Office 365. It will take care of your PST to Office 365 Migration.
I would like to tell you one of the most trusted and reliable solution by SysInfoTools termed as SysInfo PST Converter.
Oh God! Why didn’t I followed your Free manual way before moving to third party tool.
I used Advik PST Converter tool to upload PST file into Exchange Online. It did worked exactly the way I want. But I must have searched for the manual methods too.